Monday 29 February 2016

Change os boot multiple windows

hi everyone today i am gonna show use how to change multiple windows boot order it work and very easy i have windows xp and 7 installed try many things but wont work so find this easy menthod. i try windows properties advance setting mmc msconfig cant fix coz only one windows appear so...
lets start
Download Easy bcd from here and install it in your pc whatever the windows version is 
after installation open it error pop click yest next 
now for those who dont like to read see the video and follow that procedure as the problem you have 
watch this for adding new windows by drive path or old windows by change as default the youtuber shown you this ...
enjoy..... best of luck

Sunday 28 February 2016

blackberry boot animation

blackberry Z10 boot animation for android devices works on all rooted phone....
Download 

Saturday 27 February 2016

MTK batery customboot and batery logo

new charging and boot logo for android mtk devices and q mobile A910 ...
installation is simple as in old post just root the phone install custom recovery update from sd card search on the blog you ill find it 

Monday 22 February 2016

Q mobile A910 custom rom

hi every one today i found a custom rom for a910 its the best ever rom i have test on this device which gave me the best response batter environment and much more features like gesture and figure sensor lock, one more thing that i like in this rom is it changes the lower touch panel which is very nice. more about this rom it has a nice music player thousand of theme's lock panels etc. no crash yet camera works so fine download at nice speed so i recommend you should try, it works after root so root and install custom recovery search on my blog i already post that, if your signal lose after flashing dont worry also post the solution on my page search it. it will show the logo of oppo phone room is rooted change the custom boot logo as well, if like me no q mobile logo then i posted that as well enjoy...
Download
installation after root and custom recovery open recovery
backup your data first
wipe factory data
wipe cache
reboot
best of luck :)

Q mobile A910 custom logo

hi every one today i done my project use custom boot logo in place of q mobile, reason i dont like q or any company logo so i make my own its working on rooted A910 q mobile i done my effort using some custom apple logo itune logo and custom q charging signs flash this file by custom recovery and no q mobile logo. people who wont like company logo can flash this its nice one ill also change the apple logo to some other and upload it here soon till then try this 
if your not rooted search on my blog as well 

Q mobile A910 (mtk6582) custom roms

hi everyone have a bless day
today i found some very nice interesting custom roms for q mobile a910 Pakistan, i flash few of them found perfect million times batter then original, so here is the list to download them.
Cyanogenmod 12.1 (Lollipop) [Coming Soon]
MIUI 7 (KitKat)
Kitkat Unofficial
Cyanogenmod 12.1 Lollipop
Cyanogenmod 11
Color OS

you need a rooted A910 dont worry if your not rooted or don't know the procedure just follow this
install custom recovery as guide you in procedure
copy the rom in sd card and follow the below procedure
reboot you phone in recovery power it off
press vol up and down at same time and press power you ill seen recovery and factory option goto recovery
wipe factory
wipe cache
install from sd card card
follow the rom procedure its in English and done
Note: please charge your phone more then 50 per
if having problem in signals or Imei after flashing custom rom dont be worry follow this 
enjoy dont forget to join us for more interesting things.. 

Friday 19 February 2016

mtk device invalid imei or no service

Hi every one i hope you all are fine ,,,,
today i am gonna show you how to repair the no service or null invalid imei in mtk devices, like q mobile, micromax, china phones, clone, milled etc 
you just need to follow this 
first you need to root the device by so safe procedure download iroot from here
next is install it ... connect the phone in usb debug mode 
fist goto setting in mobile then click about at last option then click build 5 time click on it it show that your developer now next goto back and click developer option from there turn on usb debug 
open i root click connect let it download there drivers after click root phone will be restart dont worry its done 
watch this vidoe if your new here
next download the file mobile uncle from here 
open it then you ill find some option 
Run the MobileUncle tools App
Go to >> Engineer Mode >> Engineer Mode (MTK)
 
then

Phone 1 is IMEI 1 or SIM 1
Phone 2 is IMEI 2 or SIM 2

Tap PHONE 1 then type
AT +EGMR=1,7,"IMEI_NUM_HERE"
IMEI SHOULD BE FOUND ON THE BACK OF YOUR DEVICE UNDER BATTERY REMOVE BATTERY NOTE DOWN IN CAREFULLY
IN NON OPEN BUILD IT PHONE IT SHOULD BE ON THERE BOXES OR NEED TO OPEN IN PAKISTAN Q MOBILE AND MICROMAX INDIA VERSION

Example:
AT +EGMR=1,7,"HERE 1ST IMEI NO"
Tap PHONE 2 then type
AT +EGMR=1,10,"IMEI_NUM_HERE"
Example:
AT +EGMR=1,10,"354103033365507"
Before sending the command check your space there is a space here AT SPACE +!! now Send at Command.

Reboot the phone.

Check IMEI by dialing *#06#, IMEI should be restored and your phone is ready to use!

NOTE: Engineering commands like AT+EGMR=1,7,"" AT+EGMR=1,10,"" and AT+EGMR=1,11,"" should be available on the dropdown. You don't need to type them manually, just the IMEI inside the quotation marks.
for seconf imei seclect 2nd option which is AT +EGMR=1,10"HERE 2ND IMEI"
just reboot wait few second signal will come and that done best of luck

Thursday 18 February 2016

SP Tools for all MTP devices

i found many sp tools but wont find any working one finally after a long search i found this one its working on all MTP devices i test it on Pakistani Q mobile Indian Micromax and china Mlled L8 plus works so fine supported on windows xp, 7, 8, 8.1, 9 and & 10 Download

Sunday 14 February 2016

DOOGEE OS v1.0


Features:

1. Nice & Interactive UI. (Different than most of the roms)
2. Best ram management. (>450 free)
3. Fast and fluid. (It may lag a bit at first boot but it will be after that.)
4. Dual Sim 3G.
4. Rest find out yourself.

Download:
ROM: https://yadi.sk/d/-SSCWEqhojsDv

Kernel: (Only flash if you want better cam quality).
https://drive.google.com/file/d/0B9-PhLccKr86cWZzczN5Mm5JTGM/view?usp=sharing

Dolby ATMOS: (To get better sound)
https://drive.google.com/file/d/0B9-PhLccKr86OTZzTG16Mm9Lb1U/view?usp=sharing

INSTRUCTIONS:

1. You are responsible for everything you do to your device. I won't take any responsibility if your device bites you 
2. Reboot to recovery. Use TWRP 2.8.x.
3. Wipe everything except internal and external storage.
4. Flash rom and kernel and Dolby atmos.
5. Reboot & Enjoy.

CREDITS:
Rom Dev: Turkdevs forum
Ported By: Haseeb Ashraf


Remove Hotmail, live or outlook account from windows 8

today i am gonna show you how to remove hotmail, live or outlook id from your windows 8, 8.1 or 10. its very easy but many people wont know so lets get started.....

Open PC settings tab by clicking WINDOWS Key + I or in windows 8, 8.1 WINDOWS key + C Shortcut and hit on More PC settings...

From PC settings window click on Users options.

Now Click on Switch to Microsoft account options "switch to local account". Type user Id and password
And now log off windows 8 PC Once time.

Tuesday 9 February 2016

samsung n7100 root

today i am teach you how to root your note 2 n7100 without worrying, its so easy but many people wont know they use iroot, kingo etc tools but most of the time nothing works so here the deal
download the package from here 
extract this package and open your odin if using windows 7 open as administrator else double click to open
now click app and put the root file from same folder 
turn off your cellphone and let it in download mode 
vol down + menu + power after on remove figure from power keep pressing vol down until see mode 


now press vol up it will go into download mode plug usb your phone will detect  
first above pic shown phone will detect AP to find cf file for root start to start after stat phone will reboot dont worry it ill go into CWR let it do its work after done super user will install now your rooted ,,,, enjoy 
it works on both korean and official version if you have clone device dont try this on clone it will brick becoz clone are MTK device which is design by chines like q mobile, micromax, appo, etc it works on official devices 

Saturday 6 February 2016

Remove Icloud from running device and change its cloud id

i found a solution to day in running device before restoring device all you have to do is follow 
first its a iphone 4, iso 7.1.2 i hope on all iphone it works 


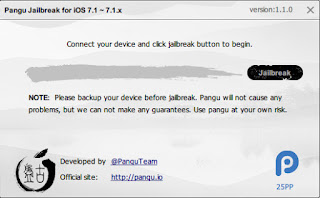
Step 1: Download the latest version of Pangu jailbreak for Mac or Windows from this page.
Step 2:Mac users: Double click on the Pangu dmg file you just downloaded to mount it.
Windows users: Launch the Pangu exe file as an Administrator. Right Click on the Pangu exe and select the “Run as Administrator” option.
Step 3: You should be presented with a screen like the one seen below. Click on the black Jailbreak button.
Step 4: Follow the on-screen instructions. The app will ask you at one point to set your iOS device to June 2nd. To do this, go to Settings -> General -> Date & Time.
Step 5: After you change the date, it should restart the process and install the Pangu app on your iOS device.
Step 6: Tap on the Pangu app on the Home screen of your device when prompted to continue with the jailbreak process. You will get a warning message, which will ask you whether you are “sure you want to open the Application “Pangu” from Developer “iPhone Distribution: Hefei Bo Fang communication technology co., LTD?”. Tap on the Continuebutton to continue with the jailbreak process.
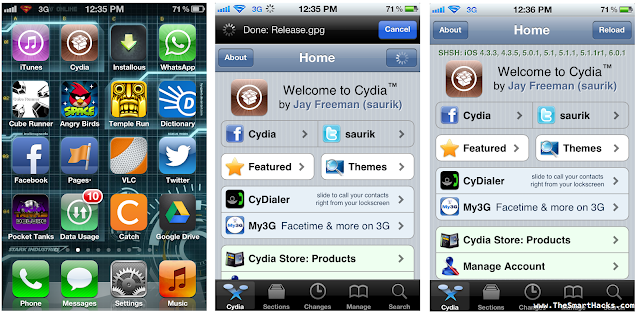
Step 7: Wait for your device to reboot several times. After a few minutes you should see that you have Cydia on your home screen and you’ll be ready to start installing tweaks on iOS 7.1.2. You can also revert back to set the time automatically via the Settings app
done jail break now open cydia in you cellphone 
Step 2: When you are done jailbreaking, click on jailbreaker's best friend, Cydia and let it update and load its resources.

Step 3: Now in Cydia go to Manage tab and then in Sources.


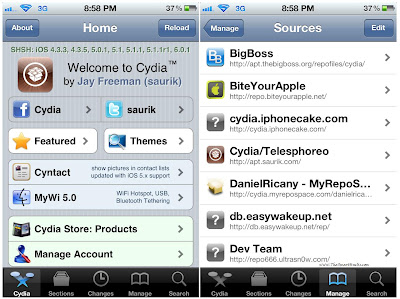
Step 4: Then in Sources section, click on Edit in the top right corner and then on Add, which will now appear in the top left corner.

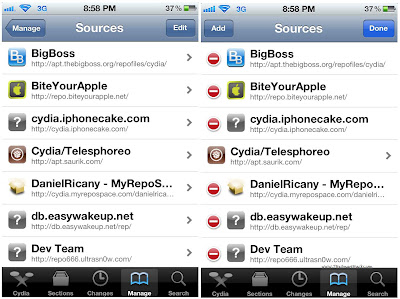
Step 5: After clicking on Add, a dialogue box appears which asks for the URL of the repository you want to add. Type ihackstore.com/repo/ in it and click on Add Source. Now, after verifying the URL, it sometimes gives a Source Warning. Do not worry about it and click on Add Anyway. Then let it download the sources from the repository you have just added and load them to Cydia. When Return to Cydia appears to screen, click on it and you'll be right back into Cydia with the sources now added and ready to be used.

Step 6: The tricky part is now over. Now go to the Search tab from the bottom and type ifile in it. There will be two (or more - depending on other repos you may have added) search results but you have to click on the top one which has a red colored symbol besides it. You can also go to Manage -> Sources -> ihackstore -> iFile . It is this file only that appears in the search results.

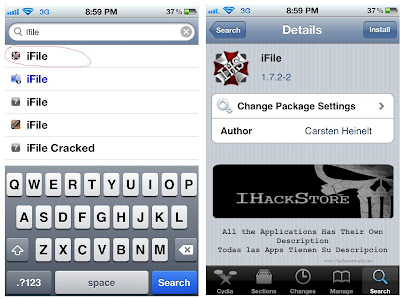
Step 7: Now click on Install button in the top right corner and then on Confirm which appears at the very same place. It is not that big in size at 7.6 MB with all its auxiliaries so it shouldn't take much time. Let iFile be downloaded and installed on your iDevice. When it comes on screen, click on Return to Cydia.

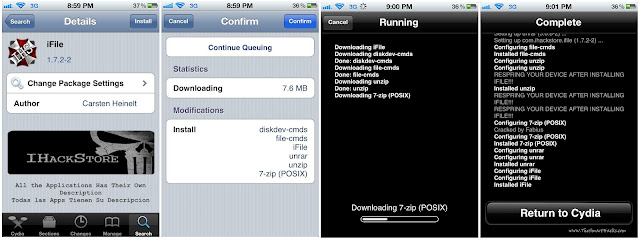
Step 8: Now when you go to your springboard, you will see a washed out white color icon with no design written iFile below it which crashes as soon as you click on it.

Don't worry. You haven't done anything wrong and the iFile has successfully installed as well. Its like installing a major program on a Windows PC - you need to reboot your device to complete the installation process.


And now the icon appears like it should and the application fulfill its purpose beautifully as well.
This is one of the most efficient and used file managing application for iDevice users and after going at it for a while, it can be safely said that it is the title it deserves. It has a very clean interface with all the right options easily accessible. Hopefully, you will have fun tinkering with it.

now moving to last step deleting icloud id from you i device 
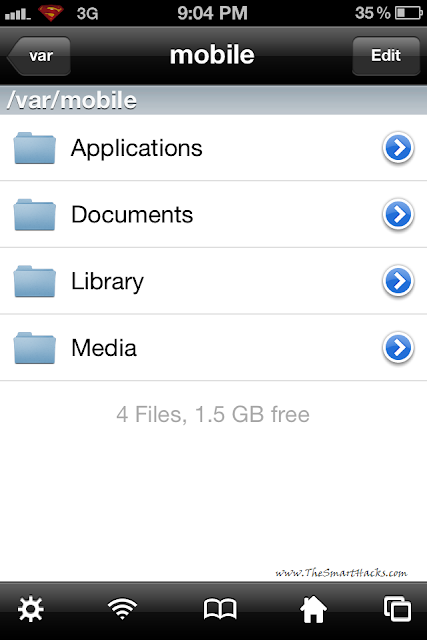
Open iFile and go to : /var/mobile/library/accounts and 
Delete : Accounts3.sqlite, Accounts3.sqlite.shm, Accounts3.sqlite.wal
Go to /var/mobile/library/ConfigurationProfiles and
Delete : ClientTruth.plist and CloudConfigurationDetails.plist
Reboot
icloud is totally remove goto setting and icloud check it no where to found now sign in with your own id reboot then device and done enjoy join us if you like us ....